A model on a stand looks fuller than just a model on a shelf, and an aircraft model in flight (unless it's hanging) or, say, an anime figure simply cannot do without a stand. What to do? Where to get a stand? Well, if the manufacturer completes the set with a stand. But not all manufacturers do this, and the “default” type of coasters is not the most presentable. Of course, you can buy branded products, you can order coasters in advertising and souvenir companies. But the price of a normal branded stand or a stand to order can cost half the cost of a set, or even more. Of course, you can make coasters yourself. If you have access to various machines (milling, turning.), That's great. What if there is no access? No problem. On the Internet, there are many articles on the independent manufacture of coasters from improvised materials. I want to bring to your attention another one.
While working on , I ran into the problem of making a model stand, however, with my luck, the solution came pretty quickly. My eyes fell on the lids of sour cream and mayonnaise, which are in my stocks. I saved them for drawing small transparent parts (glazing elements). An easy solution to the problem with the stand suddenly appeared in my head.
Sign up, we'll need:
1) Vacuum-formed lid from mayonnaise / sour cream / yogurt, etc.
2) Glue epoxy, two-component, not five minutes (important).
3) A little imagination.
As a blank for the stand, I took this lid from sour cream:
The lid must be straight. Why do we need a curved stand?
Glue can be: 
Glue must be not "five-minute". The fact is that when solidifying two-component epoxy adhesives, heat is released. When the five-minute glue hardens, a lot of heat is released, the preparation of the stand (lid) will definitely lead. There is a bad experience
Ready? Let's get to work!
The lid in an inverted position must be placed on a flat surface, leveled. If plastic windows are installed in your house, you can put the cover on the windowsill. Usually window sills of plastic windows are leveled. If there is no building level, you can use a glass of water to check. A leveled surface is needed to evenly distribute the glue over the stand blank.
The place of work is determined, the cover is laid. We knead the glue in accordance with the manufacturer's recommendations and fill the lid with it to the brim: 
To reduce the required amount of glue, reduce its heat generation, as well as to remove heat, the inside of the lid can be filled with all sorts of debris, for example, pieces of sprues.
The glue that I used in my work also gave a lot of heat, but, fortunately for me, it was not enough to lead the workpiece.
Let's give it time to cool down.
The glue is frozen. 
It is not necessary to remove the casting from the cover.
Because my stand is designed for a model aircraft in flight, I needed to attach a rod to the stand: 
To mount it in the base of the stand, I drilled a blind hole: 
In principle, the base for the stand is already there. Now it's time to use your imagination - you can add something to your taste. I decided to make a flat floor on a stand. To do this, I cut out such a circle: 
Painting, decals: 
Dosborka: 

Voila: 


Pretty cute, unusual, and most importantly - affordable stand.
On such a stand, small works of different directions will look good: figures, small armored personnel carriers, aircraft models in flight, etc.
Alexander Vergin (B!gSeXy)
Agree that in the working mess there is absolutely no place for a lot of pieces of paper with records that could ever come in handy. You always put them in one place, but in the end they are scattered all over the table. So it was with me, until I decided to make a stand for pieces of paper using the cardboard technique and a master class at the same time. The stand, of course, also serves to store clean paper. It's amazing what you can create with cardboard, fabric, and glue. The manufacturing technique is simple, you just need to be patient and be careful.
To create a stand, you need to prepare:
cardboard - 2 mm thick; fabric, preferably 100% cotton; PVA glue; whatman; glue "Moment Crystal / Universal"; stationery knife; scissors; glue brush; masking tape; pencil; ruler.
Cut out blanks from cardboard of the desired size with a clerical knife.

First, we will assemble three sides measuring 9x9 cm (two walls and the bottom of the stand), applying glue to the edges of the bottom. To make the wall at a right angle, you can adjust it by propping it up with a corner.

We glue the back wall of the stand.

We take any round object and circle it on blanks for small front walls so that we get a beveled corner.

We glue the small parts, applying glue to the edges of the walls and bottom.


This is how the glued corners of the stand should look like.

Masking tape is needed in order to secure the entire structure. We seal them all the joints inside the stand and outside. Using a stack, smooth out the adhesive tape so that there are no wrinkles.


We iron a fabric blank measuring 39x13 cm. We will glue the fabric to the walls of the stand, as if wrapping it around. We apply glue in a very thin layer on the first wall. If you apply too much, the glue may pass through the fabric and leave marks, or the cardboard may warp.

We glue this wall to the fabric. We make sure that the wall lies just in the center and there are indents.

We glue all three walls, carefully glue the small ones. We level the surface with a stack so that there are no swellings on the fabric.

We cut off the corners at an acute angle at the bottom of the stand. We glue the indents. First you need to make cuts on the fabric in places where small walls end. We do not cut off the excess fabric, we will glue the inside of the walls with it.


In the same way, we cut and glue the corners of the upper part of the stand of the rear and side walls.

Now let's prepare the fabric in the front to glue the small walls nicely.

At the bottom, evenly cut off the excess fabric to the level of the upper part of the bottom.

We make cuts accordingly.

First, we glue the upper corner, braiding it around the perimeter of the rounded part. If extra folds appear, then small cuts can be made by sticking them on top of each other. Let's bend and glue a piece of fabric that remains superfluous, but just serves the purpose so that the edge of the fabric is not visible. We carefully glue the last part, forming a flat surface and corners with a stack.

We cut out a square from whatman paper, suitable for the size of the bottom and a fabric with allowances for it.

Glue whatman paper on the ironed fabric. We cut corners at an acute angle.

We leave a segment not glued, which we glue to the upper part of the bottom.

We glue the bottom, wrapping the loose fabric up.
Cardboard paper holder.
What we need:
- Thick cardboard.
- Scissors.
- Glue (I used universal glue in the form of a pencil UHU Contact power glue).
- Pencil.
- Ruler.
- Wallpaper.
- Satin ribbons.
- Lace.
Progress:

Very often, the order on the desktop turns into a category of creative mess. A very convenient way to avoid this is to put everything in its own specific places and storage containers. For papers, it is very convenient to use cardboard coasters. Let's make a similar stand.

And for starters, we need to make a pattern on a sheet of cardboard, it is shown below. This is the main part, a tab at the bottom, and two side parts need to be made.


Using scissors, cut out a pattern from cardboard.


Using the universal glue UHU Contact power glue in the form of a convenient pencil, glue the bottom of the stand.
Then we need to close the upper and lower side parts a little, for this we will glue two side parts.


Then we need to wallpaper our stand, you can use old stocks of wallpaper that everyone often has. If there is no wallpaper, you can take colored cardboard.
It is more convenient for me to spread the box itself and apply it to the wallpaper, and then cut it out.


Don't let the joints scare you, we will decorate them with a satin ribbon.
Thus, we glue the entire stand on all sides.
If you want to sign the stand, you can make an insert on the back wall of white cardboard.
A satin ribbon can be glued along the joint line with the same glue. This is a decor, and strengthening the stand, and masks the joints.
And you can add lace, braid or beads - it all depends on your wishes and imagination.
Quick article navigation
Cardboard is easy to bend, cut, paint, glue, stitch and hold its shape, and it is always available. What you need for children's creativity, the development of fine motor skills, hand-eye coordination, logical thinking and imagination! In this article, we presented 13 super ideas, 100 photos, 1 step-by-step master class and a selection of video tutorials on making DIY cardboard crafts.
Where to get cardboard?
For the manufacture of children's crafts, in addition to sheet color or corrugated cardboard from the store, you can use the following improvised and waste materials:
- Cardboard boxes (you can ask the warehouse workers of the nearest store);
- Disposable paper tableware;
- Bushings from toilet paper and paper towels;
- Packages of cereals and sweets, such as corn flakes;
- Egg packaging (it is good to use cells);
- Dairy product packaging.
13 Cardboard Craft Ideas + Master Class
Idea 1. Construction toys
Cardboard "constructors" are good because they are easy to make and decorate, it is interesting to assemble and, of course, play with them. You can come up with and design such a toy yourself, or you can make it using a ready-made scheme from our article or found on the Internet.


Click on the photo to download the templates for these figurines

Click on the photo to download the templates for these figurines


Idea 3. Puppets or just puppets with moving parts
Making a puppet out of cardboard is very easy and fun. You just need to draw the details of the little man, cut them out and fasten them with mini pins (sold in scrapbooking stores).

- Instead of special fasteners, you can use thin wire (for example, for beading). Just cut a piece of wire 2 cm long, thread it through the holes of the parts and twist its ends from the front and back sides as shown in the photo on the right. You can also use metal rings as fasteners.
If you want the figurine to become a real puppet, then you can:
- Connect the arms and legs with a single thread, as shown in the photo below, or with two threads (one thread connects the legs, and the other connects the arms).


- Tie a rope to each arm and leg, then tie all 4 ropes to the ends of the sticks folded crosswise. An example of such a puppet is shown in the following photo.


Idea 4. Finger puppets
Finger puppets are made even easier and faster: a small figure is drawn, then two holes are cut in its lower part. Voila, the first "actor" for the puppet theater is ready! In the following selection of photos, you can get some ideas for finger puppets.


Idea 5. Ground, air, water and space transport
A car, plane, bus, ship, boat or rocket made of cardboard is just as good as a store-bought one. After all, making such a toy with your own hands together with your parents already seems like a fun adventure. And when the cardboard vehicle gets tired, it can be used to make other toys and crafts.


Idea 6. Kitchenette
If you have a couple of square-shaped boxes, then why not make a mini stove and sink out of them?


From one box of a rectangular elongated shape, you can make a refrigerator.

If there is enough space in the room, a washing machine can also be added to the kitchen.


A master class on how to make cardboard crafts in the form of kitchen furniture, see the following video.
Idea 7. Toy equipment and household items
Need props for role-playing games or things to decorate a cardboard house? We offer to make them from cardboard with your own hands.


Idea 8. Masquerade costumes
Is a matinee or performance coming up in a kindergarten or school? Or just your kid loves reincarnations? From cardboard you can make an amazing outfit. Here are photo examples of cardboard masquerade costumes for boys.


And here are photo examples of cardboard costumes for girls.


Idea 9. Bookmarks for books
For the manufacture of bookmarks, it is better to use not too thick colored cardboard, and in order for the craft to last as long as possible, it should be laminated with transparent tape.


Idea 10. Aquarium with fish
Cut off the lids of the cardboard box and paint its inside in blue-blue tones, if desired, decorate the aquarium with applications from plasticine, sparkles, colored paper, etc. Cut 3-5 holes along the top of the box and thread through each hole. Next, cut out 3-5 fish from colored paper. Attach a large button (on the outside of the aquarium) and a fish to each thread. That's it, the aquarium is ready.


Idea 11. Town in a box
You just need to cut the sides of the box and paint on the inside and... voila! You get a city with roads, with which the child will play for hours, moving cars and figures of men.

Idea 12. Volumetric toys made of corrugated cardboard using quilling technique
Volumetric crafts can be "wound" using the quilling technique from corrugated cardboard. Having mastered the skill of forming various figures, the child will be able to experiment with shapes and colors and even create figures of their favorite cartoon characters.

Materials and tools:
- Cardboard box;
- Tracing paper or white tissue paper;
- Black cardboard (you can paint ordinary cardboard with a thick layer of black paint);
- White pencil;
- Wooden skewers, straws or wire;
- Scotch tape and / or glue;
- Scissors;
- Stationery knife.
STEP 1. First we need to make the theater body. To do this, cut off the lid from the box, and then cut out its bottom.
Step 2. Cut off a piece of tracing paper that is larger than the size of the box. Gently glue it to the sides of the theater with a little tension, as shown in the photo.
Step 4. Now it's time to cut out the characters of the future performance from black cardboard. Keep in mind that the more detailed the silhouette of the figurine is, the more realistic the shadow theater will be. Therefore, it is best to draw figures using the templates found on the Internet and printed.

Step 5. The shadow theater is almost ready, it remains only to glue the figures to wooden skewers or wires. You can stick them as shown in the photo below or perpendicular to make it easier to control the characters.
Stand- a useful and convenient thing in everyday life. For example, phones or tablets, which have become an integral part of our daily lives, are a little inconvenient to use in stationary conditions. If you do not have a branded or suitable case that can secure the gadget in an inclined position, then you will have to hold it with your hands. This is inconvenient when watching a movie for a long time, while eating or reading for a long time.
The best solution to this problem may be to purchase a stand specially designed for this. But, sometimes, we need it right now, or we simply feel sorry for the money for a seemingly temporary thing. In this case, you can make a stand yourself from improvised means. It does not take a lot of time! A couple of minutes and you can comfortably sit in front of the screen of your gadget, while freeing your hands.
In this article, we will primarily rely on phone stand options, but they can also be slightly upgraded and used for tablets, books, even pictures or plates. It all depends on your imagination. But if she sleeps, then there is nothing wrong with that. The options proposed in the article are analyzed in detail, and it will not be difficult for you to slightly increase the dimensions specifically for the thing for which you are making a stand.
Handy materials to help
You can make a stand yourself from improvised materials. Almost any material that you have at home is suitable for this. It could be:
- wire
- cardboard
- cardboard box
- fabric and padding
- bottle
- wood
- paper
- pencils
- constructor
- stationery holders
- unwanted plastic cards
- old cassette
Only your imagination can limit your choice. Of course, the stores offer a huge selection of products in this category. However, making the holder yourself has a number of undeniable advantages:
- Rapidity. Sometimes a stand is needed as soon as possible, and there is no time to go to the store to buy it.
- Cheap or free. You can make a holder from what you already have in your home.
- Originality. With your own hands you will create a truly unique product.
Pencil phone stand
In order to assemble this design, you will need:
- 6 pencils
- 4 rubber bands
Despite the intricate appearance, this design is assembled very simply. The bottom line is that two pencils are fastened at the ends with an elastic band, and the third pencil is pushed between the turns of the elastic band. The result is a geometric figure - a tetrahedron. If you still have questions about how to make this version of the stand, then use the example below.
The figure clearly shows how the pencils are held together.
To avoid slipping and to make the stand more stable, use pencils with erasers on the ends.
Paper clip phone stand
The most economical and simple version of the stand, to create which you only need a paper clip.
To do this, you need to bend it into the same shape as in the figure.

This design will hold the phone without any problems.
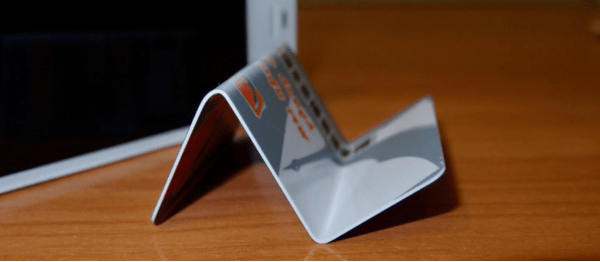
Plastic card phone holder
For this, any unnecessary plastic card will do. Just fold it along the short side, stepping back from the edge about 1 cm, and bend the rest in the opposite direction exactly in half. You will get it as shown in the picture.
Stand for phone or tablet made of cardboard
Cardboard- an excellent material that is widely used for various homemade "things". Probably, many people have a cardboard box or an unnecessary sheet of cardboard at home. It is worth trying to use it to create a stand.
For this you will need:
- cardboard
- scissors
From a sheet of cardboard folded in half, cut a strip measuring 10 by 10 cm. Then draw the figure shown in the figure on it and cut it out along the contour.

You will get a comfortable and stable stand that you can carry with you.
This holder option can be used for a tablet or a book. The essence of manufacturing is the same, only it is necessary to fit the part to the size of your gadget, as shown in the figure.

It is necessary to use well-flexible cardboard so that the stand does not "open".
It is important to understand that a cardboard stand is not necessarily a sloppy brown construction. It can be stylish, comfortable and beautiful. You just need to change the shape a little and the result will change dramatically.

Origami paper phone stand
Perhaps you do not have cardboard at home, but there is thick paper. It is also suitable for making a stand! All you need is paper and scissors. Cut out the shape as shown below, then fold along the fold lines.

That's all. The origami stand is ready to use.
Wire stand for phone or tablet
One of the budget options, made from improvised materials.
During work you will need:
- wire 2-3 mm thick
- pliers
- wire cutters to cut the wire
Everything is done as simply as possible: in the right places, the wire is bent so that a holder is made from it.
To make the design more stable, the wire can be connected with a rubber band.
Such a stand can be a real design solution: it can be painted in a different color and it will completely change, or you can fill in the “voids” with decorative wire curls. This design is suitable for both phone and tablet, the difference is only in the size of your gadget.

Unusual phone stand from Lego
Probably, this version of the stand will especially appeal to teenagers and men. Here you can show your imagination by creating a whole complex for your smartphone with the ability to change position, and maybe even amplify the sound of the speaker, or get by with a minimum of details. The creative process will not only bring pleasure, but also benefit.
To make such a design, you will need a few parts and a base. The tilt level can be changed by adding or removing details. And the position of the gadget is easy to change, just adjusting the design.

Phone stand from an old cassette
Perhaps someone has an old cassette player lying around at home. It is unlikely that it will ever come in handy, and with the advent of disks and electronic media, no one uses cassettes anymore. But still, you can find a use for the cover in which the cassette was located.
To do this, it is enough to "turn" the cassette player inside out by folding the cover back. You can put a phone in the hole where the cassette was held. One of the advantages of this design is that it is easy to wash and it is transparent.

Plastic bottle phone stand
Many of us go on a trip or travel on business by train. Often, on trains, there is nothing near the sockets where a phone could be securely placed. However, the gadget is discharged and needs to be charged. You can simplify this task with a stand made from a bottle. Its essence lies in the fact that the gadget is placed in the cut off bottom of the bottle, which remains hanging on the plug from the charging device. Thus, there is no need to stand nearby and hold the phone in your hands or look for a way to secure it.
To make this holder you will need:
- plastic bottle for shampoo or drink
- scissors
First, wash the bottle to remove any cosmetic or soda residue. Then, mark it up. The back wall of the stand should become a kind of handle on which the phone holder will hang. The front wall should be high enough so that the phone does not fall out over the edge. The next step is to cut the stand around the office.
To do this, it will be more convenient to use a sharp clerical knife.
Cut a hole in the top of the handle so that it can be attached to the charger plug. You can decorate the stand for every taste: with adhesive paper, paints or stickers.

Wooden phone or tablet stand
If you want to make an original stand, then one of the good materials for making it is wood. Such a stand will be strong, durable, and can also serve as a good gift for a loved one. It is important to understand that working with wood requires some minimal skills and special tools.
In the process of work, in addition to a wooden block, you may need materials such as:
- jigsaw
- sandpaper
- wood cutting knives
Be careful and attentive while working with such tools.
Stand manufacturing steps:
- Process the wooden block by sawing off the excess parts and making a recess in the top middle for a phone or tablet.
- Using sandpaper, remove all roughness and splinters from the surface of the future holder.
- You can cover the finished product with varnish or special paint.

Another option for a wooden stand for a phone or tablet can be called an analogue of its cardboard version. In this case, instead of a wooden block, it is better to use plywood.
To do this, make a template for the "legs" of the holder and a crossbar that will fasten them together. And transfer it to plywood. Carefully cut out with a jigsaw and smooth out irregularities and roughness with sandpaper. Using super glue, connect the legs and the crossbar.

DIY stand case for phone or tablet
The most popular option for a gadget stand is a stand case. It will take a little fiddling with it, but the result is worth it. This option is convenient to take with you when traveling, it is durable and can protect the screen.
To make this holder you will need:
- cladding material, it is best to choose leather
- interior cladding material
- simple and thick cardboard or rigid material
- rubber band for fastening
- pencil
- ruler
- scissors
- double sided tape
How to do it?
- Cut the cardboard according to the size of the tablet, so that it completely covers it. This is the future base, the dimensions of which will be the base for all elements.
- Make a few folds in the way that the front of the case will then need to bend to support the tablet.
- Now we take a hard material, which will give the case stability. Cut it so that it follows the contour of the workpiece.
- We apply to the base and make a border, so that it does not interfere with the folds.

- From the inside, we process the cover with soft materials, gluing it to the base blank with double-sided tape.
- The next step is fasteners for the tablet itself. To do this, we make small holes in the hard elements for rubber bands, which will hold the tablet.

- From the outside we glue the finishing material.
Do this as carefully as possible. The appearance of the product will depend on this.
That's all. The stand is ready! It is convenient and can be used not only as a holder, but also to protect the screen.
Pouch for tablet or phone
An original and cute version of the stand for the gadget. It is suitable for girls and can become a cute home accessory.
For manufacturing you will need:
- scissors
- the cloth
- stuffing material
- thick cardboard
- thread and needle
- button
Manufacturing process:
- First you need to cut out a template from cardboard according to the size of your gadget.
- Then cut a rectangle out of the fabric twice the size of the resulting template.
- Fold the base of the fabric in half and mark the crease with stitches 10 cm from the edge.
- Sew the bag, leaving one side unswept.
- After turning the bag inside out, position it so that the seam runs through the middle, and at the end you get a rhombus. After ironing it, bend the upper corner of the rhombus so that it is in the middle and sew. This is shown in more detail in the figure.

- Then insert cardboard into the product and fill the remaining space with stuffing material.
- Make a seam along the very edge of the template. After folding the edges of the unsewn side, carefully stitch it, leaving an opening for stuffing.
- Make a roll and sew up the hole.
That's all. The product is ready. You can decorate it to your taste, giving it even more charm!
Phone holder made of stationery clips
Another interesting and at the same time very simple option. If you have a few stationery clips at home, feel free to use them!
You will need 2 clips: one larger and one smaller. By connecting them together as shown in the figure, in a couple of seconds you will get a holder for the phone.

It can also be done with two clips of the same size.

Stand for phone from an unnecessary CD-disk
An unnecessary CD-ROM can serve as a stand for the phone. In order to make such a holder, you will need a little time and work with temperature. So be careful!
Conclusion
For a creative person, all boundaries are erased. And he can create any object with his own hands from improvised materials. For the stand, you can use options such as an ordinary office business card holder, or a book stand well known to all of us since school days, even a toilet paper sleeve can be an excellent holder option.
There are many opportunities for creativity, you just need to carefully look around. Maybe you will make the most unusual smartphone accessory with your own hands!